Do You Feel Inadequate? For Hard-Working Overachievers

I have not been a very diligent blog writer in the year of 2013. So on the last day of 2013, I decided to write a post. I thought about writing a post with the title of “Adieu 2013!” but then I changed my mind. So here is a more sensational title, “Do you feel inadequate?”

Inadequacy is an interesting feeling. While I often felt inadequate as a college and grad student in academia and sometimes as a librarian in the libraryland, I was also pretty convinced that I was quite smart and bright. (Don’t throw stones at me just yet; Look what I said is ‘was’!) So how do you feel smart and inadequate at the same time? The answer is actually quite simple. You feel inadequate because you are smart enough to know that there are smarter people than you. So feeling inadequate itself is not a bad thing. But being unable to set the goal for you to overcome that feeling is a problem. Being unable to be at peace with the fact that there will always be people who are more bright and talented than you is a problem.

I wish I realized this, much earlier in my life. But it should still count just the same. I do no longer believe that I am particularly bright nor that I am seriously inadequate. I am just OK. That’s really not bad at all. I think that actually, this is a great place to be – knowing that I am OK to be who I am. This may sound mundane to many. But I guarantee you that if you are one of those exceptionally bright and successful over-achievers with little experience in failure then this would be a particularly hard belief for you to subscribe to.

[ADDED: I also want to emphasize that smart or brilliant is not an innate quality. You have to work on it to become smart or brilliant. So if you do work on things you want to become smart about, you will become smart. Believe me and go for it. On the other hand, you also need to ‘actively decide’ on what boundary you will set up in pushing yourself towards smartness or brilliance because there will be certain things you want to preserve such as sanity and work-life balance. For example, are you willing to sacrifice your 2 hours at a gym everyday and spend that time instead for getting smarter? How about sleeping only 4 hours a day and use the rest of it on some project you love? It will work, but maybe that is or is not what you really want. (Also consider if it will be a long-term or a short-term thing.) And so, you will be less smart than those who take those measures. So you are just OK. But it is you who decide to be so! No hard feelings, right?]

(On the other hand, if you have had this belief that you are just OK in your entire career and have never been discontent with yourself, maybe that is a clear warning sign. Don’t be a seat-warmer and go find a challenge that excites your librarian heart!)

Back in January, 2013. I read this blog post by Miss July, “ego, thy name is librarianship”. Many librarians shared the angst of wanting to be recognized widely and quickly for their hard work and intelligence. But the thing is, a lot of times, what makes someone recognized is chance and luck more than anything. Sometimes, a project you put a lot of work into and is completely worthy of others’ acclaim will go unnoticed. At other times, something you haphazardly put together to meet a deadline may make you famous! When I was a babybrarian, one of my friends, Will, who was a few years senior to me in being a librarian, asked if I recognized someone’s name. I had zero idea who that person was. But during his LIS days, that person was beyond famous in the libraryland, I was told.

I am not saying that luck and chance are important to fame than hard work and intelligence to dismiss the famous ‘and’ brilliant ‘and’ hard-working people in the libraryland, whom I  admire. I just want to point out that hard work and brilliance is only a sufficient condition for being a good librarian and professional, not for gaining fame. If you are aiming at the former, your hard work and brilliance will be more than rewarded. If you are aiming at the latter, on the other hand, achieving that will be way trickier since it is mostly up to others. I am simply sharing this to help other bright librarians who are struggling with the work-life balance and the feeling of inadequacy in spite of hard work and many achievements.

I also want all LIS students and grads in the library job market to know that something similar applies to the hiring process. I used to believe that only the best candidate with the most achievements gets hired. (Just like the grades given on an absolute scale!) But this naive belief is simply not true. From serving on multiple search committees at academic libraries, I have learned that candidates’ applications, resume/CVs, and cover letters are evaluated on a relative, not an absolute scale. And each organization has different priorities, specific needs, and most of all, unique individuals on their search committees or as hiring officials at any given time. You need to be the right fit for a given position at a given time and at a specific place. Being that right fit requires a lot of luck and chance beyond your many achievements. I also saw many cases in which some candidates whom the search committee I belonged to rejected but who found jobs that are just as good as or even better than what we had to offer. So no need to fall into despair by a rejection letter. You just have to try a little longer until you get selected.

From Flickr Creative Commons by Mari Z

If I were wiser, perhaps I would have written “How to Overcome Your Feeling of Inadequacy in Five Easy Steps(!)” instead of “Do You Feel Inadequate?” Unfortunately, I don’t have such five easy steps. I can only say that it took very many years for me to understand that working on the stuff that seems to you most difficult and unenjoyable doesn’t make you the most brilliant and hard-working person (It is probably a rather poor investment of your time and brain and so please don’t do that.) and that being a good supporter and follower can make just as great a contribution to a project as being its leader. A good thing about becoming a mid-career professional and getting old is that you get to care less about stupid stuff like what others think about you and more about important stuff like what you can do to make yourself better at things you want to do because you think they matter. How smart I look to others or whether I can be famous becomes rather trivial compared to whether I can get this thing done or to work, I understand something correctly, and what I do makes me happy and proud. I also recommend great blog posts by Andromeda and Coral about how to overcome the feeling of inadequacy, particularly in library technology and coding. Like they recommend, go sit at the table and develop your own swagger!

The New Year’s Eve is a great moment for reflection. In Müdigkeitsgesellschaft (Fatigue Society) (Berlin: Matthes & Seitz, 2010), which I’ve read recently (not in German but in Korean translation), a Korean-German philosopher Byung-Chul Han writes that driven by the goal of maximizing production, the contemporary society no longer disciplines people and instead makes all of us into individual entrepreneurs. He calls this new society ‘achievement society’ over-saturated with positivity and affirmation. All of us are now free to exploit ourselves, and there is no limit to how far we can go in our own free self-exploitation.  Doesn’t this sound familiar and similar to the mantra of managing oneself and the celebration of creativity?

Happy New Year to you all!

Posted in Coding, Librarianship, Library, Technology | Tagged , , , , | 4 Comments

LITA Forum 2013 – My Talks on Google Visualization API and Faculty Bibliography

I did two presentations at LITA Forum last week. One was a concurrent session and the other was a lightning talk. This was the first time I attended a LITA Forum and it was a really great conference.  All of the LITA Forum presentations are available to everyone here: http://connect.ala.org/litaforum.

Below are the slides of my two talks.

1. Take Better Care of Library Data and Spreadsheets with Google Visualization API Query Language

2. Building a Faculty Publications Database

Posted in Coding, presentation, Technology | Tagged , , , , , , , | Comments Off on LITA Forum 2013 – My Talks on Google Visualization API and Faculty Bibliography

Redesigning the Item Record Summary View in a Library Catalog and a Discovery Interface

***  This post was originally published in ACRL TechConnect on Oct. 15, 2013. ***

A. Oh, the Library Catalog

Almost all librarians have a love-hate relationship with their library catalogs (OPAC), which are used by library patrons. Interestingly enough, I hear a lot more complaints about the library catalog from librarians than patrons. Sometimes it is about the catalog missing certain information that should be there for patrons. But many other times, it’s about how crowded the search results display looks. We actually all want a clean-looking, easy-to-navigate, and efficient-to-use library catalog. But of course, it is much easier to complain than to come up with an viable alternative.

Aaron Schmidt has recently put forth an alternative design for a library item record. In his blog post, he suggests a library catalog shifts its focus from the bibliographic information (or metadata if not a book) of a library item to a patron’s tasks performed in relation to the library item so that the catalog functions more as “a tool that prioritizes helping people accomplish their tasks, whereby bibliographic data exists quietly in the background and is exposed only when useful.” This is a great point. Throwing all the information at once to a user only overwhelms her/him. Schmidt’s sketch provides a good starting point to rethink how to design the library catalog’s search results display.

Screen Shot 2013-10-09 at 1.34.08 PM

From the blog post, “Catalog Design” by Aaron Schmidt

B. Thinking about Alternative Display Design

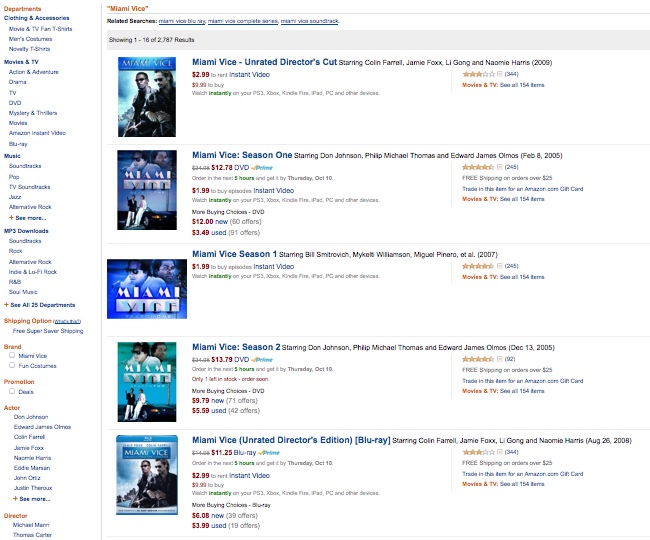
The example above is, of course, too simple to apply to the library catalog of an academic library straight away. For an usual academic library patron to determine whether s/he wants to either check out or reserve the item, s/he is likely to need a little more information than the book title, the author, and the book image. For example, students who look for textbooks, the edition information as well as the year of publication are important. But I take it that Schmidt’s point was to encourage more librarians to think about alternative designs for the library catalog rather than simply compare what is available and pick what seems to be the best among those.

Screen Shot 2013-10-09 at 1.44.36 PM

Florida International University Library Catalog – Discovery layer, Mango, provided by Florida Virtual Campus

Granted that there may be limitations in how much we can customize the search results display of a library catalog. But that is not a reason to stop thinking about what the optimal display design would be for the library catalog search results. Sketching alternatives can be in itself a good exercise in evaluating the usability of an information system even if not all of your design can be implemented.

Furthermore, more and more libraries are implementing a discovery layer over their library catalogs, which provides much more room to customize the display of search results than the traditional library catalog. Open source discovery systems such as Blacklight or VuFind provides great flexibility in customizing the search results display. Even proprietary discovery products such as Primo, EDS, Summon offer a level of customization by the libraries.

Below, I will discuss some principles to follow in sketching alternative designs for search results in a library catalog, present some of my own sketches, and show other examples implemented by other libraries or websites.

C. Principles

So, if we want to improve the item record summary display to be more user-friendly, where can we start and what kind of principles should we follow? These are the principles that I followed in coming up with my own design:

  • De-clutter.
  • Reveal just enough information that is essential to determine the next action.
  • Highlight the next action.
  • Shorten texts.

These are not new principles. They are widely discussed and followed by many web designers including librarians who participate in their libraries’ website re-design. But we rarely apply these to the library catalog because we think that the catalog is somehow beyond our control. This is not necessarily the case, however. Many libraries implement discovery layers to give a completely different and improved look from that of their ILS-es’ default display.

Creating a satisfactory design on one’s own instead of simply pointing out what doesn’t work or look good in existing designs is surprisingly hard but also a refreshing challenge. It also brings about the positive shift of focus in thinking about a library catalog from “What is the problem in the catalog?” to “What is a problem and what can we change to solve the problem?”

Below I will show my own sketches for an item record summary view for the library catalog search results. These are clearly a combination of many other designs that I found inspiring in other library catalogs. (I will provide the source of those elements later in this post.) I tried to mix and revise them so that the result would follow those four principles above as closely as possible. Check them out and also try creating your own sketches. (I used Photoshop for creating my sketches.)

D. My Own Sketches

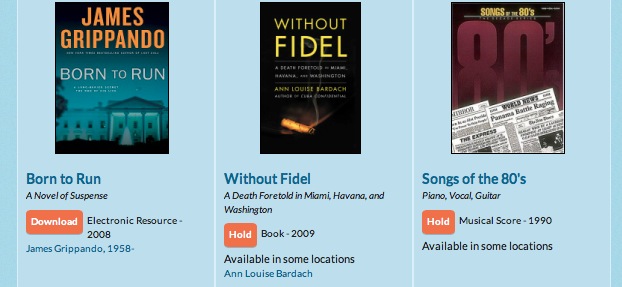
Here is the basic book record summary view. What I tried to do here is giving just enough information for the next action but not more than that: title, author, type, year, publisher, number of library copies and holds. The next action for a patron is to check the item out. On the other hand, undecided patrons will click the title to see the detailed item record or have the detailed item record to be texted, printed, e-mailed, or to be used in other ways.

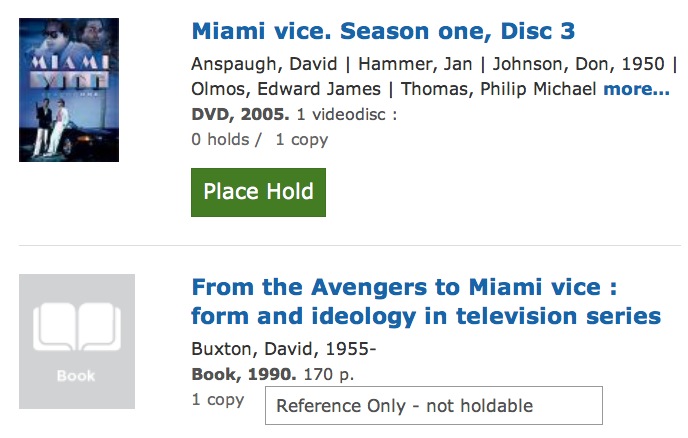
(1) A book item record

Screen Shot 2013-10-09 at 12.46.38 PM

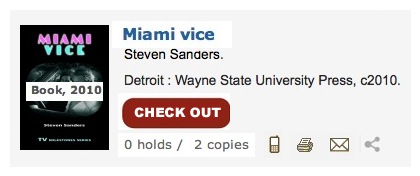
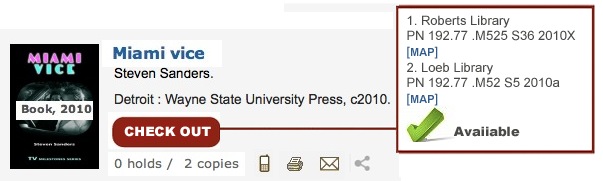
This is a record of a book that has an available copy to check out. Only when a patron decides to check out the item, the next set of information relevant to that action – the item location and the call number – is shown.

(2) With the check-out button clicked

check out box open

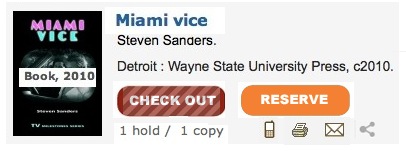
If no copy is available for check-out, the best way to display the item is to signal that check-out is not possible and to highlight an alternative action. You can either do this by graying out the check-out button or by hiding the button itself.

Many assume that adding more information would automatically increase the usability of a website. While there are cases in which this could be true, often a better option is to reveal information only when it is relevant.

I decided to gray out the check-out button when there is no available copy and display the reserve button, so that patrons can place a hold. Information about how many copies the library has and how many holds are placed (“1 hold / 1 copy”) would help a patron to decide if they want to reserve the book or not.

(3) A book item record when check-out is not available

Screen Shot 2013-10-09 at 12.34.54 PM

I also sketched two other records: one for an e-Book without the cover image and the other with the cover image. Since the appropriate action in this case is reading online, a different button is shown. You may place the ‘Requires Login’ text or simply omit it because most patrons will understand that they will have to log in to read a library e-book and also the read-online button will itself prompt log in once clicked anyway.

(4) An e-book item record without a book cover

Screen Shot 2013-10-09 at 12.35.54 PM

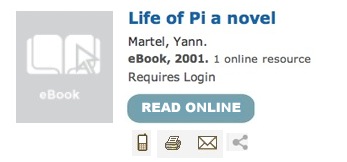
(5) An e-book item record with a book cover

Screen Shot 2013-10-09 at 12.48.33 PM

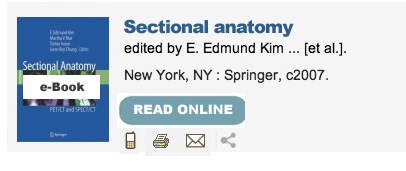
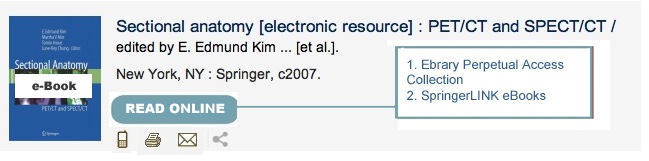
(6) When the ‘Read Online’ button is clicked, an e-book item record with multiple links/providers

When there are multiple options for one electronic resource, those options can be presented in a similar way in which multiple copies of a physical book are shown.

Screen Shot 2013-10-09 at 12.35.22 PM

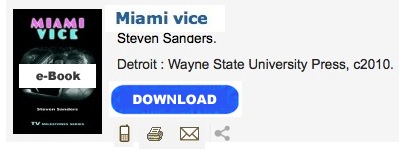
(6) A downloadable e-book item record

For a downloadable resource, changing the name of the button to ‘download’ is much more informative.

Screen Shot 2013-10-09 at 12.35.13 PM

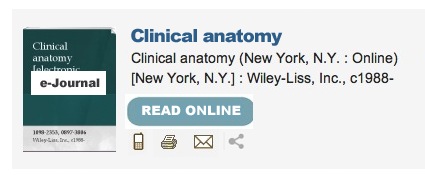
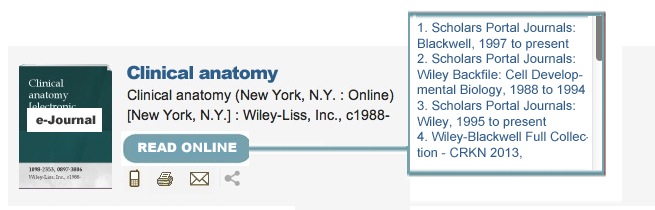
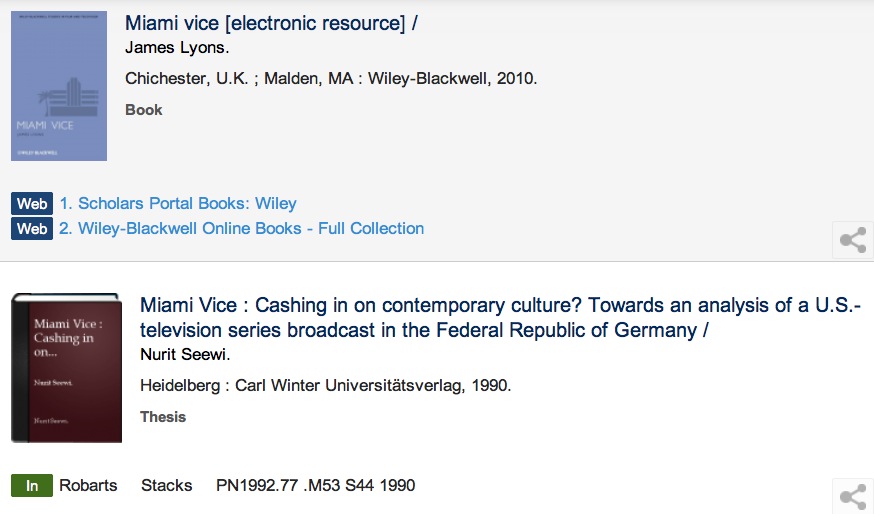
(7) An e-journal item record

Screen Shot 2013-10-09 at 12.47.31 PM

(7) When the ‘Read Online’ button is clicked, an e-journal item record with multiple links/providers

Screen Shot 2013-10-09 at 12.41.56 PM

E. Inspirations

Needless to say, I did not come up with my sketches from scratch. Here are the library catalogs whose item record summary view inspired me.

torontopublic

Toronto Public Library catalog has an excellent item record summary view, which I used as a base for my own sketches. It provides just enough information for the summary view. The title is hyperlinked to the detailed item record, and the summary view displays the material type and the year in bod for emphasis. The big green button also clearly shows the next action to take. It also does away with unnecessary labels that are common in library catalog such as ‘Author:’ ‘Published:’ ‘Location:’ ‘Link:.’

User Experience Designer Ryan Feely, who worked on Toronto Public Library’s catalog search interface, pointed out the difference between a link and an action in his 2009 presentation “Toronto Public Library Website User Experience Results and Recommendations.” Actions need to be highlighted as a button or in some similar design to stand out to users (slide 65). And ideally, only the actions available for a given item should be displayed.

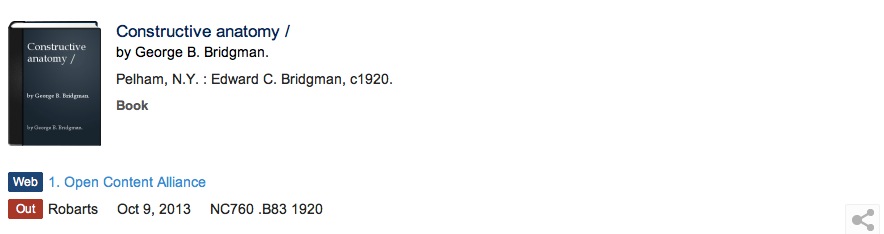
Another good point which Feely makes (slide 24) is that an icon is often the center of attention and so a different icon should be used to signify different type of materials such as a DVD or an e-Journal. Below are the icons that Toronto Public Library uses for various types of library materials that do not have unique item images. These are much more informative than the common “No image available” icon.

eAudiobooke-journal eMusic

vinyl VHS eVideo

University of Toronto Libraries has recently redesigned their library catalog to be completely responsive. Their item record summary view in the catalog is brief and clear. Each record in the summary view also uses a red and a green icon that helps patrons to determine the availability of an item quickly. The icons for citing, printing, e-mailing, or texting the item record that often show up in the catalog are hidden in the options icon at the bottom right corner. When the mouse hovers over, a variety of choices appear.

Screen Shot 2013-10-09 at 4.45.33 PM

univtoronto

Richland Library’s catalog displays library items in a grid as a default, which makes the catalog more closely resemble an online bookstore or shopping website. Patrons can also change the view to have more details shown with or without the item image. The item record summary view in the default grid view is brief and to the point. The main type of patron action, such as Hold or Download, is clearly differentiated from other links as an orange button.

richland

Screen Shot 2013-10-13 at 8.33.46 PM

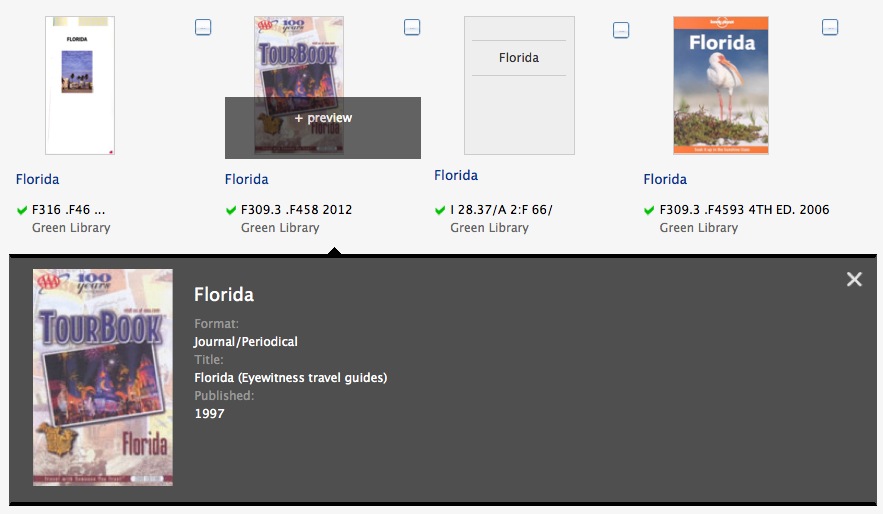
Standford University Library offers a grid view (although not as the default like Richland Library). The grid view is very succinct with the item title, call number, availability information in the form of a green checkmark, and the item location.

Screen Shot 2013-10-13 at 8.37.37 PM

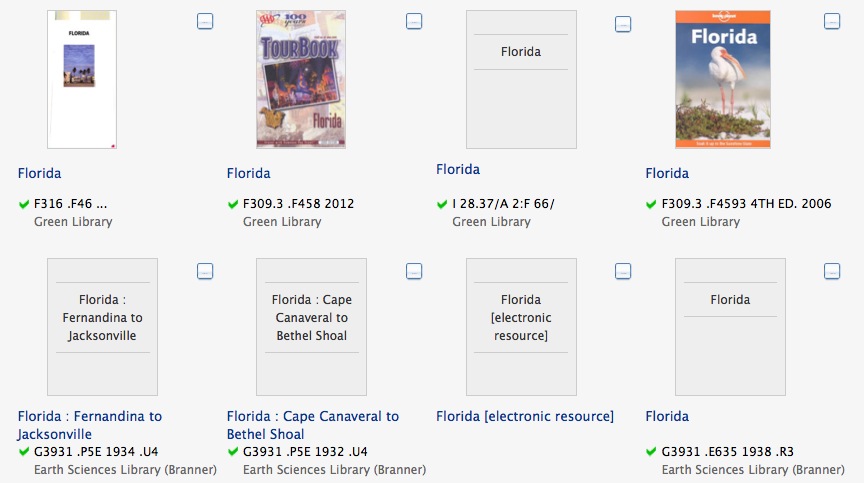
What is interesting about Stanford University Library catalog (using Blacklight) is that when a patron hovers its mouse over an item in the grid view, the item image displays the preview link. And when clicked, a more detailed information is shown as an overlay.

Screen Shot 2013-10-13 at 8.37.58 PM

Brigham Young University completely customized the user interface of the Primo product from ExLibris.

byu

And University of Michigan Library customized the search result display of the Summon product from SerialsSolutions.

Screen Shot 2013-10-14 at 11.16.49 PM

Here are some other item record summary views that are also fairly straightforward and uncluttered but can be improved further.

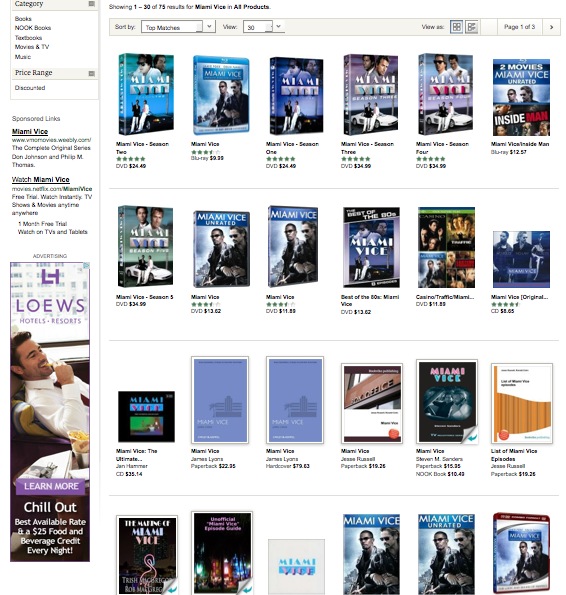
Sacramento Public Library uses the open source discovery system, VuFind, with little customization.

dcpl

I have not done an extensive survey of library catalogs to see which one has the best item record summary view. But it seemed to me that in general academic libraries are more likely to provide more information than necessary in the item record summary view and also to require patrons to click a link instead of displaying relevant information right away. For example, the ‘Check availability’ link that is shown in many library catalogs is better when it is replaced by the actual availability status of ‘available’ or ‘checked out.’ Similarly, the ‘Full-text online’ or ‘Available online’ link may be clearer with an button titled ‘Read online’ or ‘Access online.’

F. Challenges and Strategies

The biggest challenge in designing the item record summary view is to strike the balance between too little information and too much information about the item. Too little information will require patrons to review the detailed item record just to identify if the item is the one they are looking for or not.

Since librarians know many features of the library catalog, they tend to err on the side of throwing all available features into the item record summary view. But too much information not only overwhelms patrons and but also makes it hard for them to locate the most relevant information at that stage and to identify the next available action. Any information irrelevant to a given task is no more than noise to a patron.

This is not a problem unique to a library catalog but generally applicable to any system that displays search results. In their book, Designing the Search Experience , Tony Russell-Rose and Tyler Tate describes this as achieving ‘the optimal level of detail.’ (p.130)

Useful strategies for achieving the optimal level of detail for the item summary view in the case of the library catalog include:

  • Removing all unnecessary labels
  • Using appropriate visual cues to make the record less text-heavy
  • Highlighting next logical action(s) and information relevant to that action
  • Systematically guiding a patron to the actions that are relevant to a given item and her/his task in hand

Large online shopping websites, Amazon, Barnes & Noble, and eBay all make a good use of these strategies. There are no labels such as ‘price,’ ‘shipping,’ ‘review,’ etc. Amazon highlights the price and the user reviews most since those are the two most deciding factors for consumers in their browsing stage. Amazon only offers enough information for a shopper to determine if s/he is further interested in purchasing the item. So there is not even the Buy button in the summary view. Once a shopper clicks the item title link and views the detailed item record, then the buying options and the ‘Add to Cart’ button are displayed prominently.

Screen Shot 2013-10-09 at 1.21.15 PM

Barnes & Noble’s default display for search results is the grid view, and the item record summary view offers only the most essential information – the item title, material type, price, and the user ratings.

Screen Shot 2013-10-09 at 1.24.05 PM

eBay’s item record summary view also offers only the most essential information, the highest bid and the time left, while people are browsing the site deciding whether to check out the item in further detail or not.

Screen Shot 2013-10-09 at 1.28.47 PM

G. More Things to Consider

An item record summary view, which we have discussed so far, is surely the main part of the search results page. But it is only a small part of the search results display and even a smaller part of the library catalog. Optimizing the search results page, for example, entails not just re-designing the item record summary view but choosing and designing many other elements of the page such as organizing the filtering options on the left and deciding on the default and optional views. Determining the content and the display of the detailed item record is another big part of creating a user-friendly library catalog. If you are interested in this topic, Tony Russell-Rose and Tyler Tate’s book Designing the Search Experience (2013) provides an excellent overview.

Librarians are professionals trained in many uses of a searchable database, a known item search, exploring and browsing, a search with incomplete details, compiling a set of search results, locating a certain type of items only by location, type, subject, etc. But since our work is also on the operation side of a library, we often make the mistake of regarding the library catalog as one huge inventory system that should hold and display all the acquisition, cataloging, and holdings information data of the library collection. But library patrons are rarely interested in seeing such data. They are interested in identifying relevant library items and using them. All the other information is simply a guide to achieving this ultimate goal, and the library catalog is another tool in their many toolboxes.

Online shopping sites optimize their catalog to make purchase as efficient and simple as possible. Both libraries and online shopping sites share the common interests of guiding the users to one ultimate task – identifying an appropriate item for the final borrowing or access/purchase. For creating user-oriented library catalog sketches, it is helpful to check out how non-library websites are displaying their search results as well.

Screen Shot 2013-10-13 at 9.52.27 PM

music

themes

Once you start looking other examples, you will realize that there are very many ways to display search results and you will soon want to sketch your own alternative design for the search results display in the library catalog and the discovery system. What do you think would be the level of optimum detail for library items in the library catalog or the discovery interface?

Further Reading


Posted in Usability, user experience, Web | Tagged , , , , | Comments Off on Redesigning the Item Record Summary View in a Library Catalog and a Discovery Interface

Suzanne Briet’s Document Antelop in Celebration of Ada Lovelace Day

**This is part of the blog bomb that all the librarians at LibTechWomen planned and I am excited to participate. : )  Find more posts celebrating Briet today in Twitter with #briet**

Ada Lovelace from Wikipedia (http://en.wikipedia.org/wiki/File:Ada_Lovelace_portrait.jpg)

Ada Lovelace from Wikipedia (http://en.wikipedia.org/wiki/File:Ada_Lovelace_portrait.jpg)


In celebration of Ada Lovelace Day, I am posting this short blog post on a female librarian, Suzanne Briet, the author of “Qu’est-ce que la documentation? (What is Documentation?). For those who do not know Ada Lovelace, she was ‘the world’s first computer programmer, and the first person to realise that a general purpose computing machine such as Charles Babbage’s Analytical Engine could do more than just calculate large tables of numbers.’

Getting back to Briet, in her manifesto published in 1951, she argued that the antelope in the wild is not a document but the antelope in the zoo is. If you ever hear “Is the antelope a document or not?,” now you know that the antelope example comes from Briet’s manifesto.

Unfortunately, this idea of the document antelope was often wrongly attributed to Michael Buckland, a professor at the School of Information, University of California, Berkeley, who actually introduced Briet to many students in library and information science.

About Suzanne Briet’s manifesto, Michael Buckland wrote:

In her manifesto, “What is Documentation?” Briet argued that the scope of Documentation extended beyond text to evidence and she defined “document” as any material form of evidence.
(Source: http://people.ischool.berkeley.edu/~buckland/briet.html)

According to Briet, the antelope in the zoo was a document just as much as the stone in the museum or the photo of the star in the sky.

For more information, see:

Happy Ada Lovelace Day, everyone!

Posted in Librarianship, LIS, Technology | Tagged , , , , , , | Comments Off on Suzanne Briet’s Document Antelop in Celebration of Ada Lovelace Day

My Recent ALA TechSource Workshop Slides

I have recently given an ALA TechSource Workshop on “Improving Your Library’s Mobile Services.”

  • Did you know that now we spend 38 % of our Internet time on mobile?
  • And we spend more time with our smartphones than with our partners.

If you are interested in the changes that are taking place in the mobile Web and libraries, check out the slides below!

Posted in Continuing Education, Library, presentation, Technology | Tagged , , , | Comments Off on My Recent ALA TechSource Workshop Slides

10 Practical Tips for Compiling Your Promotion or Tenure File

 This post was originally published in ACRL TechConnect on Sep. 23, 2013.

Flickr image by Frederic Bisson http://www.flickr.com/photos/38712296@N07/3604417507/

If you work at an academic library, you may count as faculty. Whether the faculty status comes with a tenure track or not, it usually entails a more complicated procedure for promotion than the professional staff status. At some libraries, the promotion policy and procedure is well documented, and a lot of help and guidance are given to those who are new to the process. At other libraries, on the other hand, there may be less help available and the procedure documentation can be not quite clear. I recently had the experience of compiling my promotion file. I thought that creating a promotion file would not be too difficult since I have been collecting most of my academic and professional activities. But this was not the case at all. Looking back, there are many things I would have done differently to make the process less stressful.

While this post does not really cover a technology topic that we at ACRL TechConnect usually write about, applying for promotion and/or tenure is something that many academic librarians go through. So I wanted to share some lessons that I learned from my first-time experience of crating a promotion binder as a non-tenure track faculty.

Please bear in mind that the actual process of assembling your promotion or tenure file can differ depending on your institution. At my university, everything has to be printed and filed in a binder and multiple copies of such a binder are required for the use of the tenure and promotion committee. At some places, librarians may only need to print all documentation but don’t need to actually create a binder. At other places, you may do everything online using a system such as Digital Measures, Sedona or Interfolio, and you do not have to deal with papers or binders at all. Be aware that if you do have to deal with actual photocopying, filing, and creating a binder, there will be some additional challenges.

Also my experience described here was for promotion, not tenure. If you are applying for a tenure, see these posts that may be helpful:

1. Get a copy of the promotion and tenure policy manual of your library and institution.

In my case, this was not possible since my library as well as the College of Medicine, to which the library belongs, did not have the promotion policy until very recently. But if you work at an established academic library, there will be a promotion/tenure procedure and policy manual for librarians. Some of the manual may refer to the institution’s faculty promotion and tenure policy manual as well. So get a copy of both and make sure to find out under which category librarians fall. You may count as non-tenured faculty, tenure-track faculty, or simply professionals. You may also belong to an academic department and a specific college, or you may belong to simply your library which counts as a college with a library dean.

You do not have to read the manual as soon as you start working. It will certainly not be a gripping read. But do get a copy and file it in your binder. (It is good to have a binder for promotion-related records even if you do not actually have to create a promotion binder yourself or everything can be filed electronically.)

2. Know when you become eligible for the application for promotion/tenure and what the criteria are.

Once you obtain a copy of your library’s promotion/tenure policy, take a quick look at the section that specifies how many years of work is required for you to apply for promotion or tenure and what the promotion / tenure criteria are. An example of the rankings of non-tenure track librarians at an academic library are: Instructor, Assistant, Associate, and University Librarian. This mirrors the academic faculty rankings of Instructor, Assistant, Associate, and Full Professor. But again, your institution may have a different system. Each level of promotion will have a minimum number of years required, such as 2 years for the promotion from Instructor to Assistant Librarian, and specific criteria applied to that type of promotion. This is good to know early in your career, so that you can coordinate and organize your academic and professional activities to match what your institution expects its librarians to perform as much as possible.

3. Ask those who went through the same process already.

Needless to day, the most helpful advice comes from those librarians who went through the same process. They have a wealth of knowledge to share. So don’t hesitate to ask them what the good preparatory steps are for future application. Even if you have a very general question, they will always point out what to pay attention to in advance.

Also at some libraries, the promotion and tenure committee holds an annual workshop for those who are interested in submitting an application. Even if you are not yet planning to apply and it seems way too early to even consider such a thing, it may be a good idea to attend one just to get an overview. The committee is very knowledgeable about the whole process and consists of librarians experienced in the promotion and tenure process.

4. Collect and gather documentation under the same categories that your application file requires.

The promotion file can require a lot of documentation that you may neglect to collect on a daily basis. For example, I never bothered to keep track of the committee appointment notification e-mails, and the only reason I saved the conference program booklets were because of a colleague’s advice that I got to save them for the promotion binder in the future as the proof of attendance. (It would have never dawned on me. And even then, I lost some program booklets for conferences I attended.) This is not a good thing.

Since there was no official promotion policy for my library when I started, I simply created a binder and filed anything and everything that might be relevant to the promotion file some day. However, over the last five years, this binder got extremely fat. This is also not a good practice. When I needed those documentation to actually create and organize my promotion file, it was a mess. It was good that I had at least quite a bit of documentation saved. But I had to look through all of them again because they belonged to different categories and the dates were all mixed up.

So, it is highly recommended that you should check the categories of the application file that your library/institution requires before creating a binder. Do not just throw things into a binder or a drawer if possible. Make separate binders or drawers under the same categories that your application file requires such as publication, presentation, university service, community service, professional services, etc. Also organize the documentation by year and keep the list of items in each category. Add to the list every time you file something. Pretend that you are doing this for your work, not for your promotion, to motivate yourself.

Depending on your preference and the way your institution handles the documentation for your promotion or tenure application, it may make a better sense to scan and organize everything in a digital form as long as the original document is not required. You can use citation management system such as Mendeley or Refworks to keep the copies of all your publications for example. These will easily generate the up-to-date bibliography of your publications for your CV. If your institution uses a system that keeps track of faculty’s research, grant, publication, teaching, and service activities such as Digital Measures or Sedona, those systems may suit you better as you can keep track of more types of activities than just publications. You can also keep a personal digital archive of everything that will go into your application file either on your local computer or on your Dropbox, Google Drive, or SkyDrive account. The key is to save and organize when you have something that would count towards promotion and tenure in hand “right away.”

One more thing. If you publish a book chapter, depending on the situation, you may not get the copy of the book or the final version of your book chapter as a PDF from your editor or publisher. This is no big deal until you have to ask your college to do a rush ILL for you. So take time in advance to obtain at least one hard copy or the finished PDF version of your publication particularly in the case of book chapters.

5. What do I put into my promotion file or tenure dossier?

There are common items such as personal statement, CV, publications, and services, which are specified in the promotion/tenure policy manual. But some of the things that may not belong to these categories or that make you wonder if it is worth putting into your promotion file. It really depends on what else you have it in your application file. If your application file is strong enough, you may skip things like miscellaneous talks that you gave or newsletter articles that you wrote for a regional professional organization. But ask a colleague for advice first and check if your file looks balanced in all areas.

6. Make sure to keep documentation for projects that only lived a short life.

Another thing to keep in mind is to keep track of all the projects you worked on. As time goes on, you may forget some of the work you did. If you create a website, a LibGuide, a database application, a section in the staff intranet, etc., some of those may last a long time, but others may get used only for a while and then disappear or be removed. Once disappeared projects are hard to show in your file as part of your work and achievement unless you documented the final project result when it was up and running and being used. So take the screenshots, print out the color copies of those screenshots, and keep the record of the dates during which you worked on the project and of the date on which the project result was released, implemented etc.

If you work in technology, you may have more of this type of work than academic publications. Check your library’s promotion and tenure policy manual to see if it has the category of ‘Creative Works’ or something similar under which you can add these items.

If you are assembling your binder right now, and some projects you worked on are completely gone, check the WayBack machine from the Internet Archive and see if you can find an archived copy. Not always available, but if you don’t have anything else, this may the only way to find some evidence of your work that you can document.

7. Update your CV and the list of Continuing Education activities on a regular basis.

Ideally, you will be doing this every year when you do your performance review. But it may not be required. Updating your CV is certainly not the most exciting thing to do, but it must be done. Over the last five years, I have done CV updates only when it was required for accreditation purposes (which requires the current CVs of all faculty). This was better than not having updated my CV at all for sure. But since I did not really update it with the promotion application in mind, when I needed to create one for the promotion application file, I had to redo the CV moving items and organizing them in different categories. So make sure to check your library’s or your institution’s faculty promotion/tenure policy manual. The manual includes the format of CV that the dossier needs to adopt. Use that format for your CV and update it every year. (I think that during the Christmas holidays may be a good time for this kind of task from now on for me.)

Some people keep the most up-to-date CV in their Dropbox’s public folder, and that is also a good idea if you have a website and share your CV there.

Some of the systems I have mentioned earlier – Digital Measure and Sedona – also allow you to create a custom template which you can utilize for the promotion/tenure application purpose. If the system has been in use for many years in your institution, there may be a pre-made template for promotion and tenure purposes.

8. Make sure to collect all appointment e-mails to committees and other types of services you do.

Keeping the records of all services is a tricky thing as we tend to pay little attention to the appointment e-mails to committees or other types of services that we perform for universities or professional organizations. I assumed that they were all in my inbox somewhere and did not properly organize them. As a result, I had to spend hours looking for them when I was compiling my binder.

This can be easily avoided if you keep a well-organized e-mail archive where you file e-mails as they come in. Sometimes, I found that I either lost the appointment e-mail or never received one. You can file other email correspondences as documentation for that service. But the official appointment e-mail would certainly be better in this case.

This also reminded me that I should write thank-you e-mails to the members of my committees that I chaired and to the committee chairs I worked with as a board member of ALA New Members Round Table. It is always nice to file a letter of appreciation rather than a letter of appointment. And as a committee chair or a board member, it should be something that you do without being asked. By sending these thank you e-mails, your committee members or chairs can file and use them when they need for their performance, promotion, or tenure review without requesting and waiting.

9. Check the timeline dates for the application.

Universities and colleges usually have a set of deadlines you have to meet in order for you to be considered for promotion or tenure. For example, you may have to have a meeting by a certain date with your supervisor or your library dean and get the green light to go for promotion. Your supervisor may have to file an official memorandum to the dean’s office until a certain date as a formal notification. Your department chair (if you are appointed to an academic department) may have to receive a memo about your application by a certain date. Your promotion file may have to be submitted to your academic department’s Promotion and Tenure committee by some time in advance before it gets forwarded to the Promotion and Tenure committee of the college. The list goes on and on. These deadlines are hard to keep tabs on but have to be tracked carefully not to miss them.

10. Plan ahead

I had to compile and create my promotion binder and three copies within a week’s notice, but this is a very unusual case due to special circumstances. Something like this is unlikely to happen to you, but remember that creating the whole application file will take much more time than you imagine. I could have done some of the sorting out and organizing documentation work myself in advance but delayed it because there was a web data application which I was developing for my library. Looking back, I should have at least started working on the promotion file even if things were unclear and even if I had little time to spare outside of my ongoing work projects. It would have given me a much more accurate sense of how much time I will have to spend eventually on the whole dossier.

Also remember to request evaluation letters in advance. This was the most crazy part for me because I was literally given one week to request and get letters from internal and external reviewers. Asking people of a letter in a week’s time is close to asking for the impossible particularly if the reviewers are outside of your institution and have to be contacted not by you but by a third party. I was very lucky to get all the signed PDF letters in time, but I do not recommend this kind of experience to anyone.

Plan ahead and plan well in advance. Find out whether you need letters from internal or external reviewers, how many, and what the letters need to cover. Make sure to create a list of colleagues you can request a letter from who are familiar with your work. When you request a letter, make sure to highlight the promotion or tenure criteria and what the letter needs to address, so that letter writers can quickly see what they need to focus on when they review your work. If there are any supplementary materials such as publications, book chapters, presentations, etc., make sure to forward them as well along with your CV and statement.

Lastly, if Your Application File Must be In Print…

You are lucky if you have the option to submit everything electronically or to simply submit the documentation to someone who will do the rest of work such as photocopying, filing, making binders, etc. But your institution may require the application file to be submitted in print, in multiple copies sometimes. And you may be responsible for creating those binders and copies yourself. I had to submit 4 binders, each of which exactly identical, and I was the one who had to do all the photocopying, punching holes, and filing them into a binder. I can tell you photocopying and punching holes for the documents that fill up a very thick binder and doing that multiple times was not exactly inspiring work. If this is your case as well, I recommend creating one binder as a master copy and using the professional photocopy/binding service to create copies. It would have been so much better for my sanity. In my case, the time was too short for me to create one master copy and then bring it to the outside service to make additional copies. So plan ahead and make sure you have time to use outside service. I highly recommend not using your own labor for photocopying and filing.

* * *

If you have any extra tips or experience to share about the promotion or tenure process at an academic library, please share them in the comments section. Hopefully in the future, all institutions will allow people to file their documentation electronically. There are also tools such as Interfolio (http://www.interfolio.com/) that you can use, which is particularly convenient for those who has to get external letters that directly have to go to the tenure and promotion committee.

Are there any other tools? Please share them in the comments section as well. Best of luck to all librarians going for promotion and tenure!


Posted in Librarianship | Tagged , , , , | Comments Off on 10 Practical Tips for Compiling Your Promotion or Tenure File

Fear No Longer Regular Expressions

*** This post has been originally published on ACRL TechConnect Blog on July 31, 2013. ***

Regex, it’s your friend

You may have heard the term, “regular expressions” before. If you have, you will know that it usually comes in a notation that is quite hard to make out like this:

(?=^[0-5\- ]+$)(?!.*0123)\d{3}-\d{3,4}-\d{4}

Despite its appearance, regular expressions (regex) is an extremely useful tool to clean up and/or manipulate textual data. I will show you an example that is easy to understand. Don’t worry if you can’t make sense of the regex above. We can talk about the crazy metacharacters and other confusing regex notations later. But hopefully, this example will help you appreciate the power of regex and give you some ideas of how to make use of regex to make your everyday library work easier.

What regex can do for you – an example

I looked for the zipcodes for all cities in Miami-Dade County and found a very nice PDF online (http://www.miamifocusgroup.com/usertpl/1vg116-three-column/miami-dade-zip-codes-and-map.pdf). But when I copy and paste the text from the PDF file to my text editor (Sublime), the format immediately goes haywire. The county name, ‘Miami-Dade,’ which should be in one line becomes three lines, each of which lists Miami, -, Dade.

Ugh, right? I do not like this one bit. So let’s fix this using regular expressions.

(**Click the images to bring up the larger version.)

Screen Shot 2013-07-24 at 1.43.19 PM

Screen Shot 2013-07-24 at 1.43.39 PM

Like many text editors, Sublime offers the find/replace with regex feature. This is a much powerful tool than the usual find/replace in MS Word, for example, because it allows you to match many complex cases that fit a pattern. Regular expressions lets you specify that pattern.

In this example, I capture the three lines each saying Miami,-,Dade with this regex:

Miami\n-\nDade.

When I enter this into the ‘Find What’ field, Sublime starts highlighting all the matches. I am sure you already guessed that \n means a new line. Now let me enter Miami-Dade in the ‘Replace With’ field and hit ‘Replace All.’

Screen Shot 2013-07-24 at 2.11.43 PM

As you can see below, things are much better now. But I want each set of three lines – Miami-Dade, zipcode, and city – to be one line and each element to be separated by comma and a space such as ‘Miami-Dade, 33010, Hialeah’. So let’s do some more magic with regex.

Screen Shot 2013-07-24 at 2.18.17 PM

How do I describe the pattern of three lines – Miami-Dade, zipcode, and city? When I look at the PDF, I notice that the zipcode is a 5 digit number and the city name consists of alphabet characters and space. I don’t see any hypen or comma in the city name in this particular case. And the first line is always ‘Miami-Dade.” So the following regular expression captures this pattern.

Miami-Dade\n\d{5}\n[A-Za-z ]+

Can you guess what this means? You already know that \n means a new line. \d{5} means a 5 digit number. So it will match 33013, 33149, 98765, or any number that consists of five digits. [A-Za-z ] means any alphabet character either in upper or lower case or space (N.B. the space at the end right before ‘]’).

Anything that goes inside [ ] is one character. Just like \d is one digit. So I need to specify how many of the characters are to be matched. if I put {5}, as I did in \d{5}, it will only match a city name that has five characters like ‘Miami,’ The pattern should match any length of city name as long as it is not zero. The + sign does that. [A-Za-z ]+ means that any alphabet character either in upper or lower case or space should appear at least or more than once. (N.B. * and ? are also quantifiers like +. See the metacharacter table below to find out what they do.)

Now I hit the “Find” button, and we can see the pattern worked as I intended. Hurrah!

Screen Shot 2013-07-24 at 2.24.47 PM

Now, let’s make these three lines one line each. One great thing about regex is that you can refer back to matched items. This is really useful for text manipulation. But in order to use the backreference feature in regex, we have to group the items with parentheses. So let’s change our regex to something like this:

(Miami-Dade)\n\(d{5})\n([A-Za-z ]+)

This regex shows three groups separated by a new line (\n). You will see that Sublime still matches the same three line sets in the text file. But now that we have grouped the units we want – county name, zipcode, and city name – we can refer back to them in the ‘Replace With’ field. There were three units, and each unit can be referred by backslash and the order of appearance. So the county name is \1, zipcode is \2, and the city name is \3. Since we want them to be all in one line and separated by a comma and a space, the following expression will work for our purpose. (N.B. Usually you can have up to nine backreferences in total from \1 to\9. So if you want to backreference the later group, you can opt not to create a backreference from a group by using (?: ) instead of (). )

\1, \2, \3

Do a few Replaces and then if satisfied, hit ‘Replace All’.

Ta-da! It’s magic.

Screen Shot 2013-07-24 at 2.54.13 PM

Regex Metacharacters

Regex notations look a bit funky. But it’s worth learning them since they enable you to specify a general pattern that can match many different cases that you cannot catch without the regular expression.

We have already learned the four regex metacharacters: \n, \d, { }, (). Not surprisingly, there are many more beyond these. Below is a pretty extensive list of regex metacharacters, which I borrowed from the regex tutorial here: http://www.hscripts.com/tutorials/regular-expression/metacharacter-list.php . I also highly recommend this one-page Regex cheat sheet from MIT (http://web.mit.edu/hackl/www/lab/turkshop/slides/regex-cheatsheet.pdf).

Note that \w will match not only a alphabetical character but also an underscore and a number. For example, \w+ matches Little999Prince_1892. Also remember that a small number of regular expression notations can vary depending on what programming language you use such as Perl, JavaScript, PHP, Ruby, or Python.

Metacharacter Description
\ Specifies the next character as either a special character, a literal, a back reference, or an octal escape.
^ Matches the position at the beginning of the input string.
$ Matches the position at the end of the input string.
* Matches the preceding subexpression zero or more times.
+ Matches the preceding subexpression one or more times.
? Matches the preceding subexpression zero or one time.
{n} Matches exactly n times, where n is a non-negative integer.
{n,} Matches at least n times, n is a non-negative integer.
{n,m} Matches at least n and at most m times, where m and n are non-negative integers and n <= m.
. Matches any single character except “\n”.
[xyz] A character set. Matches any one of the enclosed characters.
x|y Matches either x or y.
[^xyz] A negative character set. Matches any character not enclosed.
[a-z] A range of characters. Matches any character in the specified range.
[^a-z] A negative range characters. Matches any character not in the specified range.
\b Matches a word boundary, that is, the position between a word and a space.
\B Matches a nonword boundary. ‘er\B’ matches the ‘er’ in “verb” but not the ‘er’ in “never”.
\d Matches a digit character.
\D Matches a non-digit character.
\f Matches a form-feed character.
\n Matches a newline character.
\r Matches a carriage return character.
\s Matches any whitespace character including space, tab, form-feed, etc.
\S Matches any non-whitespace character.
\t Matches a tab character.
\v Matches a vertical tab character.
\w Matches any word character including underscore.
\W Matches any non-word character.
\un Matches n, where n is a Unicode character expressed as four hexadecimal digits. For example, \u00A9 matches the copyright symbol

Matching modes

You also need to know about the Regex matching modes. In order to use these modes, you write your regex as shown above, and then at the end you add one or more of these modes. Note that in text editors, these options often appear as checkboxes and may apply without you doing anything by default.

For example, [d]\w+[g] will match only the three lower case words in ding DONG dang DING dong DANG. On the other hand, [d]\w+[g]/i will match all six words whether they are in the upper or the lower case.

Look-ahead and Look-behind

There are also the ‘look-ahead’ and the ‘look-behind’ pattern in regular expressions. These often cause confusion and are considered to be a tricky part of regex. So, let me show you a simple example of how it can be used.

Below are several lines of a person’s last name, first name, middle name, separated by his or her department name. You can see that this is a snippet from a csv file. The problem is that a value in one field – the department name- also includes a comma, which is supposed to appear only between different fields not inside a field. So the comma becomes an unreliable separator. One way to solve this issue is to convert this csv file into a tab limited file, that is, using a tab instead of a comma as a field separater. That means that I need to replace all commas with tabs ‘except those commas that appear inside a department field.’

How do I achieve that? Luckily, the commas inside the department field value are all followed by a space character whereas the separator commas in between different fields are not so. Using the negative look-ahead regex, I can successfully specify the pattern of a comma that is not followed by (?!) a space \s.

,(?!\s)

Below, you can see that this regex matches all commas except those that are followed by a space.

lookbehind

For another example, the positive look-ahead regex, Ham(?=burg) , on the other hand, will match ‘Ham‘ in Hamburg when it is applied to the text: Hamilton, Hamburg, Hamlet, Hammock.

Below are the complete look-ahead and look-behind notations both positive and negative.

  • (?=pattern)is a positive look-ahead assertion
  • (?!pattern)is a negative look-ahead assertion
  • (?<=pattern)is a positive look-behind assertion
  • (?<!pattern)is a negative look-behind assertion

Can you think of any example where you can successfully apply a look-behind regular expression? (No? Then check out this page for more examples: http://www.rexegg.com/regex-lookarounds.html)

Now that we have covered even the look-ahead and the look-behind, you should be ready to tackle the very first crazy-looking regex that I introduced in the beginning of this post.

(?=^[0-5\- ]+$)(?!.*0123)\d{3}-\d{3,4}-\d{4}

Tell me what this will match! Post in the comment below and be proud of yourself.

More tools and resources for practicing regular expressions

There are many tools and resources out there that can help you practice regular expressions. Text editors such as EditPad Pro (Windows), Sublime, TextWrangler (Mac OS), Vi, EMacs all provide regex support. Wikipedia (https://en.wikipedia.org/wiki/Comparison_of_text_editors#Basic_features) offers a useful comparison chart of many text editors you can refer to. RegexPal.com is a convenient online Javascript Regex tester. FireFox also has Regular Expressions add-on (https://addons.mozilla.org/en-US/firefox/addon/rext/).

For more tools and resources, check out “Regular Expressions: 30 Useful Tools and Resources” http://www.hongkiat.com/blog/regular-expression-tools-resources/.

Library problems you can solve with regex

The best way to learn regex is to start using it right away every time you run into a problem that can be solved faster with regex. What library problem can you solve with regular expressions? What problem did you solve with regular expressions? I use regex often to clean up or manipulate large data. Suppose you have 500 links and you need to add either EZproxy suffix or prefix to each. With regex, you can get this done in a matter of a minute.

To give you an idea, I will wrap up this post with some regex use cases several librarians generously shared with me. (Big thanks to the librarians who shared their regex use cases through Twitter! )

  • Some ebook vendors don’t alert you to new (or removed!) books in their collections but do have on their website a big A-Z list of all of their titles. For each such vendor, each month, I run a script that downloads that page’s HTML, and uses a regex to identify the lines that have ebook links in them. It uses another regex to extract the useful data from those lines, like URL and Title. I compare the resulting spreadsheet against last month’s (using a tool like diff or vimdiff) to discover what has changed, and modify the catalog accordingly. (@zemkat)
  • Sometimes when I am cross-walking data into a MARC record, I find fields that includes irregular spacing that may have been used for alignment in the old setting but just looks weird in the new one. I use a regex to convert instances of more than two spaces into just two spaces. (@zemkat)
  • Recently while loading e-resource records for government documents, we noted that many of them were items that we had duplicated in fiche: the ones with a call number of the pattern “H, S, or J, followed directly by four digits”. We are identifying those duplicates using a regex for that pattern, and making holdings for those at the same time. (@zemkat)
  • I used regex as part of crosswalking metadata schemas in XML. I changed scientific OME-XML into MODS + METS to include research images into the library catalog. (@KristinBriney)
  • Parsing MARC just has to be one. Simple things like getting the GMD out of a 245 field require an expression like this: |h\[(.*)\] MARCedit supports regex search and replace, which catalogers can use. (@phette23)
  • I used regex to adjust the printed label in Millennium depending on several factors, including the material type in the MARC record. (@brianslone )
  • I strip out non-Unicode characters from the transformed finding aids daily with regex and replace them with Unicode equivalents. (@bryjbrown)


Posted in Coding | Tagged , , , | Comments Off on Fear No Longer Regular Expressions

Stealth Librarianship: Creating Meaningful Connections Through User Experience, Outreach, and Liaising

I am doing a part of the ACRL E-Learning Webcast,  “Stealth Librarianship: Creating Meaningful Connections Through User Experience, Outreach, and Liaising,” next Tuesday with Kiyomi Deards and Erin Dorney and very excited about it.

I will be covering UX as a base for successful outreach and liaising activities. Kiyomi and Erin will discuss the stealth librarian liaising and the stealth librarian outreach respectively. If you can, join Erin and Kiyomi and me! If not, here are the slides of my part. The twitter hashtag is #stealthlib.

Part 1: UX for Stealth Librarian Outreach

Here are some info about the webcast for those who are interested:

Stealth Librarianship: Creating Meaningful Connections Through User Experience, Outreach, and Liaising
April 23, 2013
11 a.m. Pacific | 12:00 p.m. Mountain | 1:00 p.m. Central | 2:00 p.m. Eastern

90 minutes

Description: Relationships are at the heart of providing a satisfactory user experience and delivering library services and programs that match with what our users want and need. Many libraries have traditionally spoken with users only when necessary or when a problem has occurred. Looking at user experience, outreach, and liaison librarianship from the perspective of relationship-building between librarians and faculty, staff, or students allows librarians to provide more targeted and desired services while increasing positive perceptions of libraries. This live webcast investigates the benefits of relationship-building in a holistic manner. Instead of focusing on one aspect of librarianship, public, technical, and outreach services are examined as different means to the same end: better services through better campus relationships.

Join three academic librarians specializing in user experience, outreach, and liaison librarianship to discover how they use relationship-building to enhance their work. Learn how user experience research, outreach, and stealth librarianship can be used to create meaningful connections within the campus community. Presenters will examine the benefits of strong personal relationships and how they can improve the visibility and reputation of the library on campus. Additionally, hear how quality relationships can lead to the acquisition of new resources and the evolution of services to better meet users needs. Participants will perform a brief environmental scan, help to create an open access list of outreach activities, and share their own tips for successful stealth librarianship.

Learning Outcomes:

Learn to create a practical strategy in order to consciously shape and deliver positive user experience with the library staff in person and online.
List specific outreach activities which will engage users in order to build positive relationships between the library and its users.
Analyze nontraditional opportunities for engagement in order to prioritize and maximize the impact of time allotted to nontraditional engagement.

Presenter(s): Kiyomi D. Deards, Assistant Professor, University of Nebraska-Lincoln; Erin Dorney, Outreach Librarian, Millersville University; Bohyun Kim, Digital Access Librarian, Florida International University

Target Audience: Librarians who want to improve the overall user experience of the library environment. Librarians who are subject specialist and/or have liaison duties with specific academic departments or schools. Librarians who perform outreach activities to faculty and students. Librarians who manage the library’s social media channels.


Posted in Library, Usability, user experience | Tagged , , , , | Comments Off on Stealth Librarianship: Creating Meaningful Connections Through User Experience, Outreach, and Liaising

Playing with JavaScript and JQuery – the Ebook link HTML string generator and the EZproxy bookmarklet generator

***This post has been published in ACRL TechConnect on April 8, 2013. ***

In this post, I will describe two cases in which I solved a practical problem with a little bit of JavaScript and JQuery. Check them out first here before reading the rest of the post which will explain how the code works.

  1. Library ebook link HTML string generator
  2. EZproxy bookmarklet generator – Longer version (with EZproxy Suffix)
  3. EZproxy bookmarklet generator – Shorter version (with EZproxy Prefix)

Source: http://www.flickr.com/photos/albaum/448573998/

1. Library ebook link HTML string generator

If you are managing a library website, you will be using a lot of hyperlinks for library resources. Sometimes you can distribute some of the repetitive tasks to student workers, but they are usually not familiar with HTML. I had a situation in which I needed to add a number of links for library e-books for my library’s Course E-book LibGuide page, when I was swamped with many other projects at the same time. So I wondered if I could somehow still use the library’s student assistant’s help by creating an providing a simple tool, so that the student only needs to input the link title and url and get me the result as HTML. This way, I can still delegate some work when I am swamped with other projects that require my attention. (N.B. Needless to say, this doesn’t mean that what I did was the best way to use the student assistance for this type of work. I didn’t want them to edit the page directly because this page had tabs tabs and the student using the WYSWYG editor might inadvertently remove part of the tabbed box code.)

The following code exactly does that.

This HTML form takes an e-book title and the link to the book as input and spits out a hyperlink as a list item as a result. For example, if you fill in the title field with ‘Bradley’s Neurology in Clinical Practice’ and the link field with its url: http://ezproxy.fiu.edu/login?url=http://www.mdconsult.com/public/book/view?title=Daroff:+Bradley’s+Neurology+in+Clinical+Practice, then the result would be shown in the text area : <li><a href=”http://ezproxy.fiu.edu/login?url=http://www.mdconsult.com/public/book/view?title=Daroff:+Bradley’s+Neurology+in+Clinical+Practice”> Bradley’s Neurology in Clinical Practice</a></li>  I also wanted the library student assistant to be able to do this for many e-books at once and just send me the whole set of HTML snippets that cover all ebooks. So after running the form once, if one fills out the title and the link field with another e-book information, the result would be added to the end of the previous HTML string and be displayed in the text area. The result would be like this: <li><a href=”http://ezproxy.fiu.edu/login?url=http://www.mdconsult.com/public/book/view?title=Daroff:+Bradley’s+Neurology+in+Clinical+Practice”> Bradley’s Neurology in Clinical Practice</a></li><li><a href=”http://ezproxy.fiu.edu/login?url=http://www.accessmedicine.com/resourceTOC.aspx?resourceID=64″>Cardiovascular Physiology</a></li>. Since the code is in the text area, the student can also edit if there was any error when s/he was filling out the form after clicking the button ‘Send to Text Area’.

Now, let’s take a look at what is going on behind the scene. This is the entire html file. The Javascript/JQuery code that is generating the html string in the text area is from line 22-32.

<html>
<head>
<script type="text/javascript" src="http://ajax.googleapis.com/ajax/libs/jquery/1.8.0/jquery.min.js"></script>
</head>
<body>
	<p>
		This page creates the html-friendly string for a link with a title and a url. 
		<ul>
		<li>Fill out the form below and click the button. </li>
		<li>If the link is messy, clean up first by using the <a href="http://meyerweb.com/eric/tools/dencoder/">URL decoder</a>.</li>
		<li>Copy and paste the result inside the text area after you are done.</li>
		</ul>	
	</p>
	<p>
		Title: <input type="text" id="title1" size="100"/><br/>
		Link: <input type="text" id="link1" size="100"/><br/>
		<button id="b1">Send to Text Area</button>
	</p>
	<p id="result1"></p>
	<textarea rows="20" cols="80"></textarea>

	<script type="text/javascript">
	$(document).ready(function(){	
	  $("#b1").click(function(){
	  //  alert('<a href="'+$("#link").val()+'">' + $("#title").val()+"</a>");
	    $('#result1').text('<li><a href="'+$("#link1").val()+'">' + $("#title1").val()+"</a></li>");
	    var res1='<li><a href="'+$("#link1").val()+'">' + $("#title1").val()+"</a></li>";
	    $('textarea').val($('textarea').val()+res1);
	 //   $('textarea').text(res1);
	  });
	}); // doc ready
	</script>

</body>
</html>

Since I am using JQuery I am starting with the obligatory $(document).ready in line 2. In line 3,  I am giving a callback function that will be executed when the #b1 – the button with the id of b1 in line 17 above- is clicked.  Line 4 is commented out. I used this initially to test if I am getting the right string out of the input from the title and the link field using the JS alert. Line 5 is filling the p tag with the id of result 1 in line 19 above with the thus-created string. The string is also saved in variable res1 in line 7. Then it is attached to the content of the textarea field in line 8. Line 9 is commented out. If you use line 9 instead of line 8, any existing content in the textarea will be removed and only the new string created from the title and the link field will show up in the text area.

<script type="text/javascript">
	$(document).ready(function(){	
	  $("#b1").click(function(){
	  //  alert('<a href="'+$("#link").val()+'">' + $("#title").val()+"</a>");
	    $('#result1').text('<li><a href="'+$("#link1").val()+'">' + $("#title1").val()+"</a></li>");
	    var res1='<li><a href="'+$("#link1").val()+'">' + $("#title1").val()+"</a></li>";
	    $('textarea').val($('textarea').val()+res1);
	 //   $('textarea').text(res1);
	  });
	}); // doc ready
</script>

You do not have to know a lot about scripting to solve a simple task like this!

2. EZproxy bookmarklet generator – Longer version

My second example is a bookmarklet that reloads the current page through a specific EZproxy system.

If you think that this bookmarklet reinvents the wheel since the LibX toolbar already does this, you are correct. And also if you are a librarian working with e-resources, you already know to add the EZproxy suffix at the end of the domain name of the url when a patron asks if a certain article on a web page is available through the library or not. But I found that no matter how many times I explain this trick of adding the EZproxy suffix to patrons, the trick doesn’t seem to stick in their busy minds. Also, many doctors and medical students, who are the primary patrons of my library, work at the computers in hospitals and they do not have the necessary privilege to install a toolbar on those computers. But they can create a bookmark.

Similarly, many students asked me why there is no LibX toolbar for their mobile devices unlike in their school laptops. (In the medical school where I work, all students are required to purchase a school-designated laptop; this laptop is pre-configured with all the necessary programs including the library LibX toolbar.) Well, mobile devices are not exactly computers and so the browser toolbar doesn’t work. But students want an alternative and they can create a bookmark on their tablets and smartphones. So the proxy bookmarklet is still a worthwhile tool for the mobile device users.

This is where the bookmarklet is: http://htmlpreview.github.com/?https://github.com/bohyunkim/examples/blob/master/bkmklt.html. To test, drag the link on the top that says Full-Text from FIU Library to your bookmark toolbar. Then go to http://jama.jamanetwork.com/Issue.aspx?journalid=67&issueID=4452&direction=P. Click the new bookmarklet you got on your toolbar. The page will reload and you will be asked to log in through the Florida International University EZproxy system. When you are authenticated, you will be seeing the page proxied: http://jama.jamanetwork.com.ezproxy.fiu.edu/Issue.aspx?journalid=67&issueID=4452&direction=P.

You will be surprised to see how simple the bookmarklet is (and there is even a shorter version than this which I will show in the next section). It is a JavaScript function wrapped inside a hyperlink. Lines 2-5 each takes the domain name, the path name, and any search string after the url path from the current window location object. So in the case of http://jama.jamanetwork.com.ezproxy.fiu.edu/Issue.aspx?journalid=67&issueID=4452&direction=P, location.host is http://jama.jamanetwork.com and location.pathname is Issue.aspx . The rest of the url ?journalid=67&issueID=4452&direction=P — is location.search. In line 4, I am putting my institution’s ezproxy suffix between these two, and in line 5, I am asking the browser load this new link.

<a href="javascript:(function(){
	var host=location.host;
	var path=location.pathname;
	var srch=location.search;
	var newlink='http://'+host+'.ezproxy.fiu.edu'+path+srch;
	window.open(newlink);
})();">Full-Text from FIU Library</a>

Now let’s take a look at the whole form. I created this form for those who want to create a ready-made bookmarklet recipe. All they need is their institution’s EZproxy suffix and whatever name they want to give to the bookmarklet. Once one fills out those two fields and click ‘Customize’ button, one will get the full HTML page code with the bookmarklet as a link in it.

<html>
<head>
<script type="text/javascript" src="http://ajax.googleapis.com/ajax/libs/jquery/1.8.0/jquery.min.js"></script>
</head>
<body>
<h1>EZproxy Bookmarklet</h1>	
<p><ul><li>
	<a href="javascript:(function(){
		var host=location.host;
		var path=location.pathname;
                var srch=location.search;
                var newlink='http://'+host+'.ezproxy.fiu.edu'+path+srch;
		window.open(newlink);
	})();">Full-Text from FIU Library</a> 
	(Drag the link to the bookmark toolbar!)
</li></ul></p>
<p>This is a bookmarket that will reroute a current page through FIU EZproxy.
	<br/>
If you have the LibX toolbark installed, you do not need this bookmarklet. Simply select 'Reload Page via XYZ EZproxy' on the menu that appears when you right click.
	<br/>
Created by Bohyun Kim on March, 2013. 	
</p>
<h2>How to Test</h2>
<ul>
	<li>Drag the link above to the bookmark toolbar of your web browser.</li>
	<li>Click the bookmark when you are on a webpage that has an academic article.</li>
	<li>It will ask you to log in through the FIU EZproxy.</li>
	<li>Once you are authenticated and the library has a subscription to the journal, you will will able to get the full-text article on the page.</li>
	<li>Look at the url and see if it contains .ezproxy.fiu.edu. If it does, the bookmarklet is working.</li>
</ul>	

<h2>Make One for Your Library</h2>
	<p>
		Bookmark title: <input type="text" id="title1" size="40" placeholder="e.g. Full-Text ABC Library"/>
		<em>e.g. Full-text ABC Library</em>
		<br/>
		Library EZproxy Suffix: <input type="text" id="link1" size="31" placeholder="e.g. ezproxy.abc.edu"/>
		<em>e.g. ezproxy.abc.edu
		<br/>
		<button id="b1">Customize</button></em>
	</p>
	<p><strong>Copy the following into a text editor and save it as an html file.</strong></p>
	<ul>
		<li>Open the file in a web browser and drag your link to the bookmark toolbar.</li>
	</ul>	
	<p id="result1" style="color:#F7704F;">**Customized code will appear here.**</p>
	<p><strong>If you want to make any changes to the code:</strong></p>
	<textarea rows="10" cols="60"></textarea>

	<script type="text/javascript">
	$(document).ready(function(){	
	  $("#b1").click(function(){
		var pre="&lt;html&gt; &lt;head&gt; &lt;script type=&quot;text/javascript&quot; src=&quot;http://ajax.googleapis.com/ajax/libs/jquery/1.8.0/jquery.min.js&quot;&gt;&lt;/script&gt; &lt;/head&gt; &lt;body&gt; &lt;a href=&quot;javascript:(function(){ var hst=location.host; var path=location.pathname; var srch=location.search; var newlink='http://'+hst";
		var link1=$('#link1').val();
		var post="'+path+srch; window.open(newlink); })();">";
	  	var title=$("#title1").val();
	  	var end="&lt;/a&gt; &lt;/body&gt; &lt;/html&gt;";
	  	var final=$('<div />').html(pre+"+'."+link1+post+title+end).text()
	  	$('#result1').text(final);
	    $('textarea').val(final);
	  });
	}); // doc ready
	</script>

</body>
</html>

That ‘customize’ part is done here with several lines of JQuery. You will notice that the process is quite similar to what I did in my first example. In lines 4-8, I am just stitching together a bunch of text strings to spit out the whole code in the text area eventually when the ‘Customize’ button is clicked. All special characters used in HTML tags such as ‘<‘ and ‘>’ have been changed to html enities. In line 9, I am taking the entire string saved in the variable end —I hope you name your variables a little more carefully than I do!–  and adding it to an empty div so that the string would be set as the inner HTML property of that div. And then I retrieve it using the .text() method. The result is the HTML code with the html entities decoded.

<script type="text/javascript">
	$(document).ready(function(){	
	  $("#b1").click(function(){
		var pre="&lt;html&gt; &lt;head&gt; &lt;script type=&quot;text/javascript&quot; src=&quot;http://ajax.googleapis.com/ajax/libs/jquery/1.8.0/jquery.min.js&quot;&gt;&lt;/script&gt; &lt;/head&gt; &lt;body&gt; &lt;a href=&quot;javascript:(function(){ var hst=location.host; alert(hst); var path=location.pathname; var srch=location.search; var newlink='http://'+hst";
		var link1=$('#link1').val();
		var post="'+path+srch; window.open(newlink); })();">";
	  	var title=$("#title1").val();
	  	var end="&lt;/a&gt; &lt;/body&gt; &lt;/html&gt;";
	  	var final=$('<div />').html(pre+"+'."+link1+post+title+end).text()
	  	$('#result1').text(final);
	    $('textarea').val(final);
	  });
	}); // doc ready
</script>

Not too bad, right? I hope these examples show how just a few or several lines of code can be used to solve your practical problems at work. Coding is there for you to automate time-consuming and/or repetitive tasks.

3. EZproxy bookmarklet generator – Shorter version

There is a simpler way to create a EZproxy bookmarklet than the one sketched above. If you simply add EZproxy prefix in front of the entire url of the page where a user is is, you achieve the same result. In this case, you do not have to break the url with host, pathname, search string, etc.

<a href="javascript:void(location.href=%22http://ezproxy.fiu.edu/login?url=%22+location.href)">Full-Text from FIU Library</a>

Here are the code for this much simpler EZproxy bookmarklet and the bookmarklet generator. If you know the prefix of you library’s EZproxy prefix, you can make one for your library.

So there are many ways to get the same thing done. Some are more elegant and some are less so. Usually a shorter one is a more elegant solution. The lesson is that you usually get to the most elegant solution after coming up with many less elegant solutions first.

Do you have a problem that can be solved by creating several lines of code? Have you ever solved a practical problem using a bit of code? Share your experience in the comments!


Posted in Coding, Web | Tagged , , , , | 1 Comment

Using Git with BitBucket: Basic commands – pull, add, commit, push

If you do coding, you will be making lots of tiny little changes to a file. You are also likely to be working on multiple computers at different locations. For documents and other types of files, we often use Dropbox or Google Drive/Docs. Tools like Dropbox and Google Drive/Docs are central repositories, and they allow you to always keep the most up-to-date version of the file, make changes to it, save it, and then access it at another computer. Dropbox and Google Drive/Docs also supports version-control. With those tools, you can review changes and revert to the previous state of file if you would like.

BitBucket is a tool similar to Dropbox. And it works with Git. Git is is a distributed revision control and source code management (SCM) system.  GitHub, which is another version-controlled repository web site is popular among coders and also uses Git. (If you want to try this with GitHub, the process is pretty much the same, but you may want to start by cloning somebody’s existing repo. Check out this ACRL TechConnect post by Eric.) BitBucket is similar to GitHub but it allows a completely private repository which is not supported in the free GitHub plan. So if you are working on stuff and don’t want them to be seen publicly until you are ready to release, BitBucket is a good choice.

In this post, I will show you the very basic commands of Git and  how I make changes to files, sync my local repository with the BitBucket repository, add/commit them to my local repo and push them to the remote repo in BitBucket for those who are not familiar with Git. Here, I assume that you already have git installed and set up a repository in BitBucket. If not, there are many tutorials online and also the instruction you get after signing up for BitBucket is quite clear and straightforward.

Once you are all set, the first step I run in my repo is always status command. When I type in git status in the command line (I am using Terminal in Mac), git shows in red that in my repo there are two files that I modified but have not committed. This means that the files were added, meaning they were explicitly added by the git add command but changed without being committed. You can make all sorts of changes to files but until you run the git commit command, it is sort of not official and you cannot push your changes and sync your updated files in the local repo with the remote repo.

**If the image is blurry, just double-click it and you will be able to see the clear version.**

git status

Git_status

But I also vaguely remember that I worked on some files in this remote repo from home several days ago and pushed the changes. Those changes have not yet been reflected in my local repo at my work computer. So I want to sync my local repo with the remote repo first, which has more up-to-date files. To do this, I run the following command. This literally pulls in all the changes from the remote repo to my local repo. And after a few seconds, you get the message that everything went well and you are good to go.

git pull origin master

Git_pull

Now at this point, I can start work on all the up-to-date files. So I go ahead and make some more changes to the two files – bkmklt.html and link.html. After that, I am ready to make the changes official, I run the commit command. You can type in a specific file name you want to commit  or you can just use a dot to make Git to commit all modified files. The commit command requires a commit message. So you have to add some message at the end. Here I write that I removed some comment lines. The message is more important if the change is for other people but try to make it as specific as possible.

If I have created a completely new file in my local repo (that is a designated folder where I set up a Git repo), I will have to add the file first in order to be able to commit it. You can do so by git add filename.xyz and you should be ready to commit it. If you want to add all new files you can also use a dot (.)  instead of a file name.

Below, I ran the status command again before running the commit command.

git commit . -m “removing some comment lines”

Git_commit

So the modified files have been committed now. But they are still in my local repo. If I want to get to them later from another computer however, I need to sync these files with the central repo in BitBucket. The push command does that. You are pushing out your local changes into the remote repo here. If all goes well, you will get the success message as  shown below. (Type in your BitBucket password when prompted.)

git push origin master

Git_push

The change is also recorded in my BitBucket account page.

bitbucket


I can also view the changes I made in BitBucket. The red part means what I deleted and the green part means what I added.

diff

Now when I go home and want to work on these files, I will start with “git pull origin master” to sync my home computer with the remote that is up-to-date.

It is really very much like Dropbox or Google Docs except that you get to type in lots of commands. I hope this will help those who are curious about Git but somewhat intimidated by the command lines! So try it out if you are curious.

Here is a great diagram that shows the command sequence of Git. And the entire Git cheatsheet is at: http://byte.kde.org/~zrusin/git/git-cheat-sheet-medium.png

Screen Shot 2013-03-25 at 4.23.29 PM

If you want to go to the next level and try working on someone else’s project in GitHub by forking and branching, here is a good tutorial “How to GitHub: Fork, Branch, Track, Squash and Pull Request” by Rich Jones. There are also many other resources for learning and using Git and GitHub at the ALA ALCTS/LITA CodeYear IG github repository.


Posted in Coding | Tagged , , | Comments Off on Using Git with BitBucket: Basic commands – pull, add, commit, push